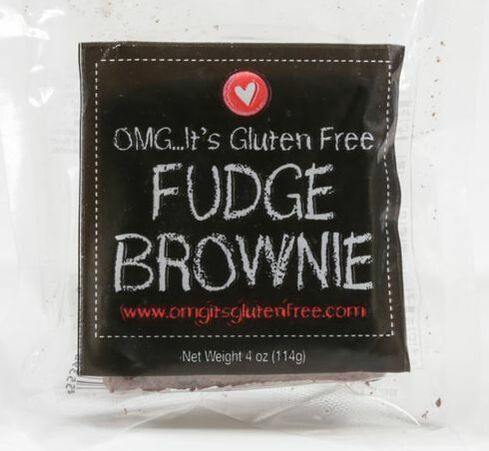
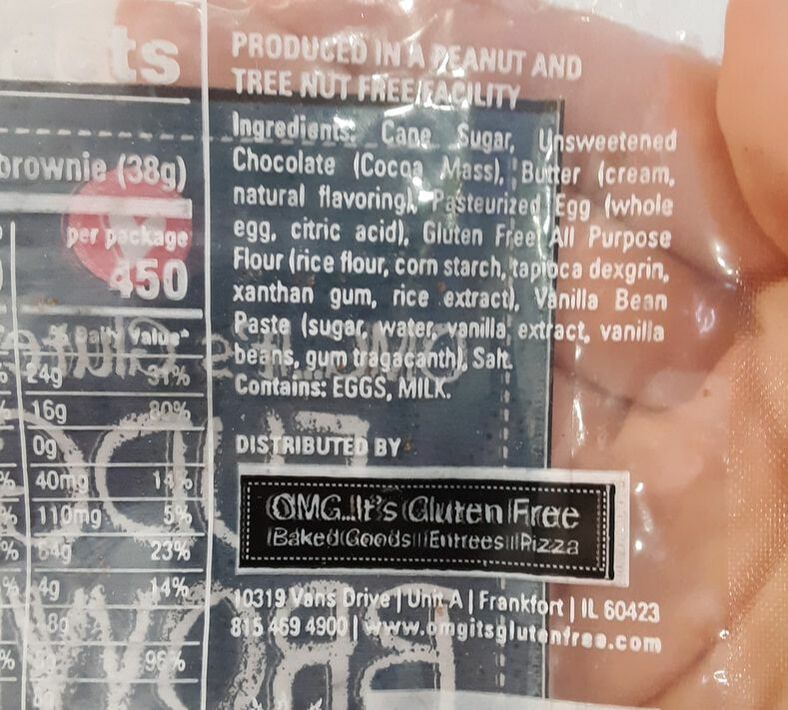
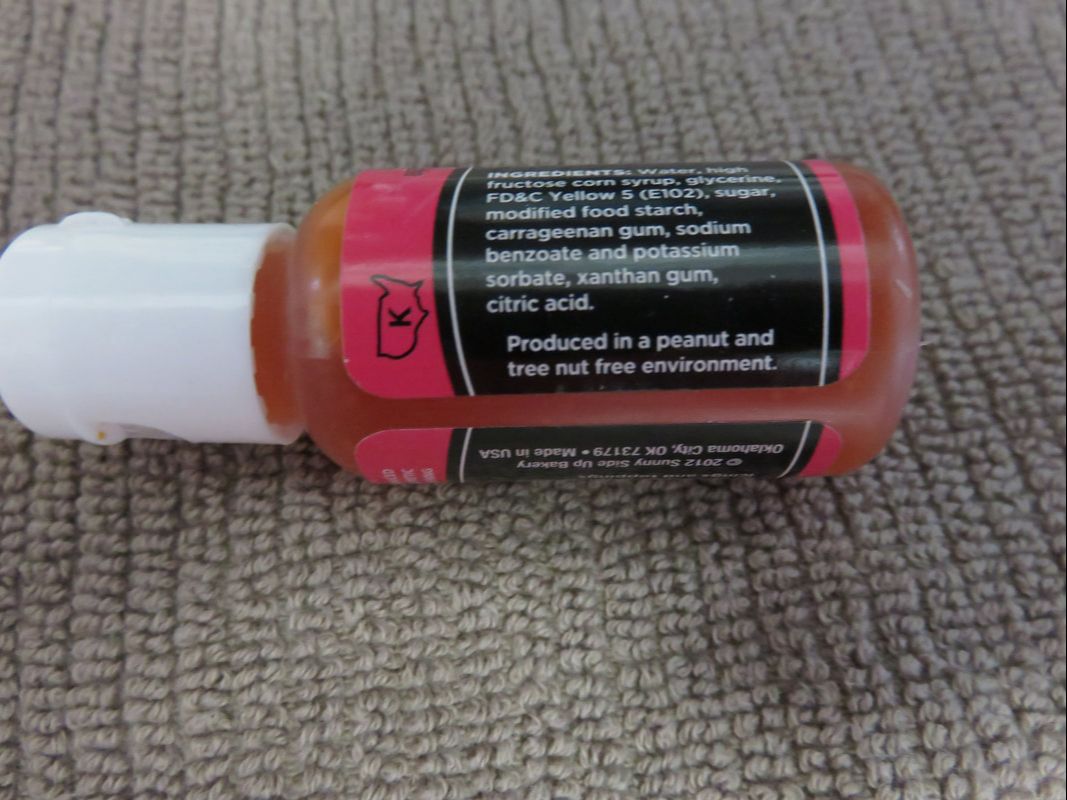
 One of our favorite things about Disney? The snacks! You probably have your own favorites there too, and you've seen a few of our copycat ones, but doesn't it stink when on your next visit, you don't see the same things you had last time and fell in love with? While some things are never changing, like the Dole Whips, or Mickey Pretzels, others are in a constant rotation, things like cupcakes, cones and prepackaged specialty baked goods. If there's an allergy in your house, I'm sure you especially know how upsetting that can be. Your choices for treats are already limited, and when your choices shrink, it can make your trip to the Magic Kingdom not as magical. Recently we experienced that when Disney switched up some of their offerings, in particular, the prepackaged cookie and brownie area. Where previously they had sold OMG Brand products, now, it's two different brands, and the brownie, which is definitely a good substitution dessert in the sea of cross contact forbidden cupcakes, was made in a facility with nuts. If you've got a nut allergy, do you REALLY want to take that chance and ruin your vacation? We don't. So of course, we did what anyone would do. Food allergy people understand. We PANICKED. I won't lie, my heart was heavy and there were tears and I felt absolutely sick to my stomach. The very few treats that our 6 year old would actually want had now been cut in half, and when you are 6, and everyone else has something yummy, that's a Big Deal. Thankfully, I discovered that you can still buy the OMG products, directly through their website! What's even more exciting, is buying them ahead of time is actually going to SAVE us money, over The Mouse's Markup. I was so excited about this, I decided to share with you guys, so that you can have a safe, or heck, just plain AMAZING Disney dessert, AND save money! They didn't ask me to write this, and might think I'm slightly crazy for how obsessed we are over these, but I want to make sure everyone knows! Don't don't let the gluten free part scare you if you don't need to be gluten free. I admit, I wondered if they would have the "healthy" taste of Enjoy Life products, but O.M.G. I bit into one, and the heavens opened. A choir of angels sung, and for just a brief moment, through the heavy snow falling, the sun shone and everything was perfect. Then my kids gave the puppy dog eyes and sighing, I handed over the rest. They say these are gluten free....I cannot tell at all. They are so incredibly fudge-y inside, flaky on the tops, moist, rich...I could go on and on. The perfect brownie has been made, and it is one most everyone can enjoy! The brownies are shipped freshly made, sealed in pretty thick plastic, and are meant to be frozen, and thawed. Once thawed, they say to use within two weeks. I hope they last that long here. I have them in the freezer right now, so I can practice thawing before our summer trip. I'll be buying more, so that when the oldest buys Disney treats to bring home, the youngest can eat his heart out on these brownies. These are even going to replace the Wolfgang Puck brownies I bring back every time and free. I can even keep a stash for when SURPRISE! There is a birthday party I didn't hear about until the last minute, and didn't have time for make him his own cupcakes! OMG has a lot of other products too, cookies, rolls, pizza dough, muffins...a big list! If the other things taste as good as these, you won't be disappointed. Another great thing? Their customer service! Before I even ordered, I sent several emails with questions, and was surprised at how fast I got answers! When does that EVER happen? I think it was even the owner herself who answered me each time! Huge! Shipping was free, I don't know if it's that way on all orders, but it was only about 3 days from when I ordered, to when I got my brownies! So fast! They weren't broken or crumbly at all, like I worried about. I'm excited to try these jazzed up too! Ice cream on top, or whipped cream and hot fudge, shaped like Mickey.... these stand alone, but a dash of Disney sprinkles, when I can manage to find them, will definitely be awesome! Here's a peek what they look like kind, of hard to see through the wrapper. It's not safe for me to open any more, and I forgot to take pictures while it was out! (The three seconds it lasted!) And, here is the ingredients label, for you to check out, yourself. If you go into the Food Service tab, you can see all of their ingredients, for all their products. Isn't that so nice? I sure appreciate it.
I will say, you will see these on Amazon. Don't buy them there. WAAAAY overpriced. Buy directly. And tell everyone you know, because these things are so amazing, it's a disservice NOT to share the word, and help get them into stores everywhere! Happy eating! And if you stop by my house? Umm. Sorry. All out. Can't share. Nope. Move along. Nothing to see here...
0 Comments
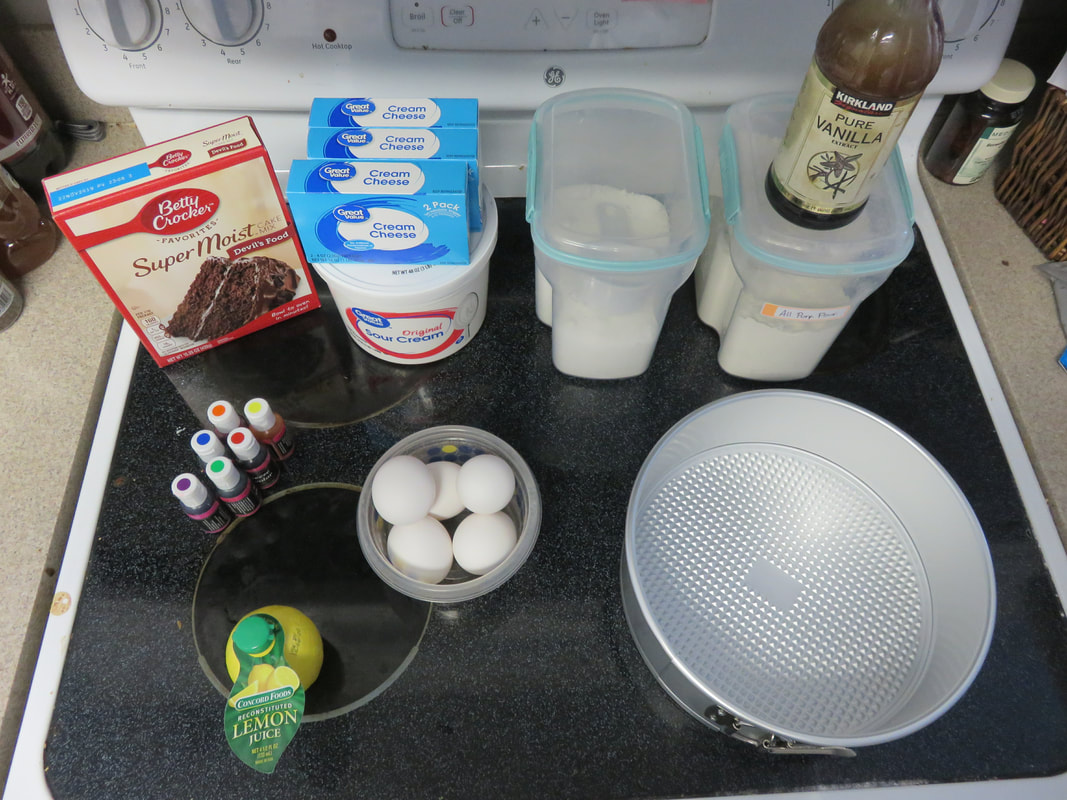
 It's time for another copycat recipe!! I admit, I was VERY intimidated thinking about making this, but little man wanted it so badly, I gave it a shot, so that I could guarantee it would be completely safe for his allergies. Much to my surprise, it was easier than I thought it would be, AND it was really tasty! Like so many other recipes I do, you can change this up a little bit to suit YOU and your needs. While the original version at Pop Century Resort has Red Velvet Cake on the bottom, don't want it? Do chocolate! Or white, and make those colors really pop! Have a holiday approaching? Don't do the bright neon colors, do pastel, or red, white and blue, or even a team's colors! Make a large one, or make a bunch of minis (I did both!) This is very versatile! The most labor intensive part is the amount of dishes it creates. I'm going to show you step by step, then put the recipe at the end. This recipe is actually enough to make 24 mini cheesecakes, and one 9 inch springform pan cheesecake, not quite full. When you think about these bring around $6 each at Disney...it's much better to do it DIY! the total cost of ingredients, for me, was around $7, because I had the icing colors on hand, and the vanilla and sugar, I only calculated the portion that I used in my cost. I'm using the same icing colors that I used in the Copycat Banana Split Cupcakes, because I love (and need) them from a Nut Free Facility.
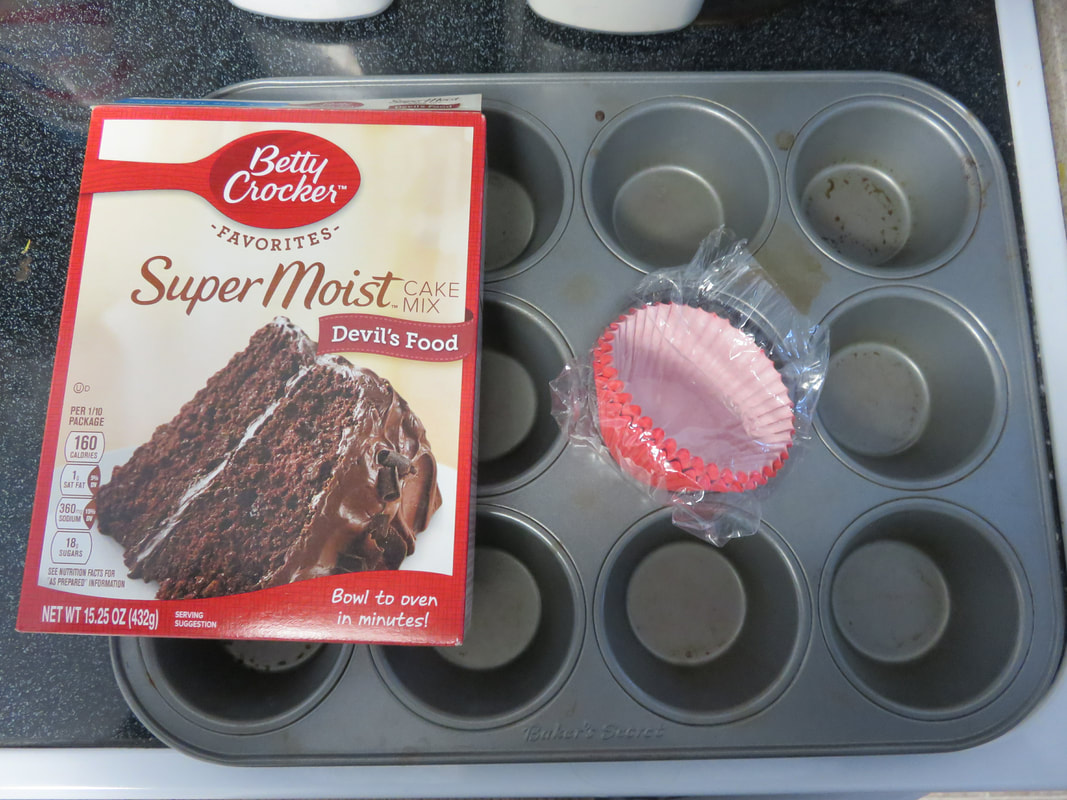
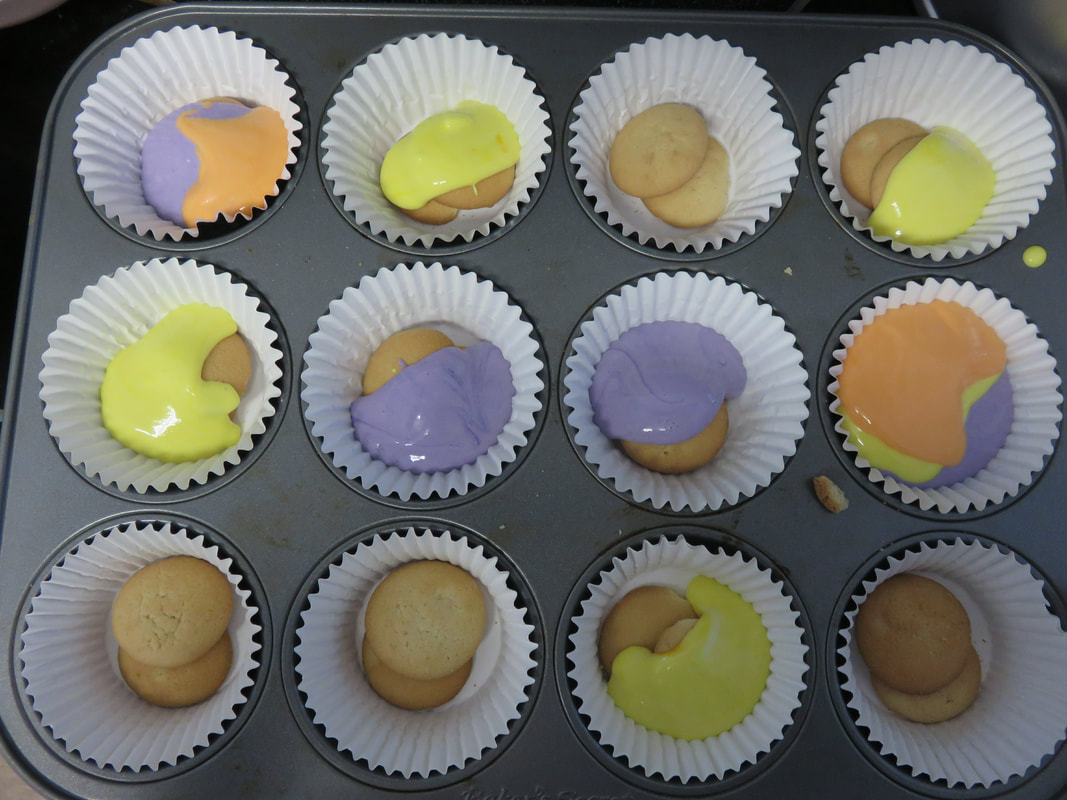
If you are making a large cake, go ahead and mix the batter, putting about half of it in your springform, and put it in the oven. If you are making only minis, line the pan, and put in the bottom of each something like a vanilla wafer, or a piece of graham cracker.. It makes a nice crust, and makes it easier to handle the cheesecake. Mix your cream cheese, sugar, sour cream, eggs, vanilla and lemon until smooth. 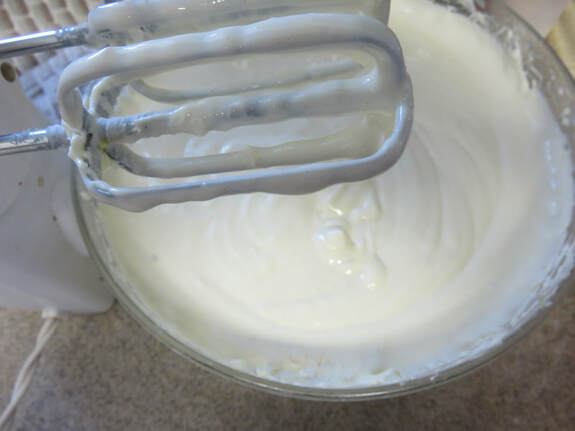 Divide the mixture into small bowls, one bowl for each color you want your cheesecake to be, and then color it until you are happy with the color. 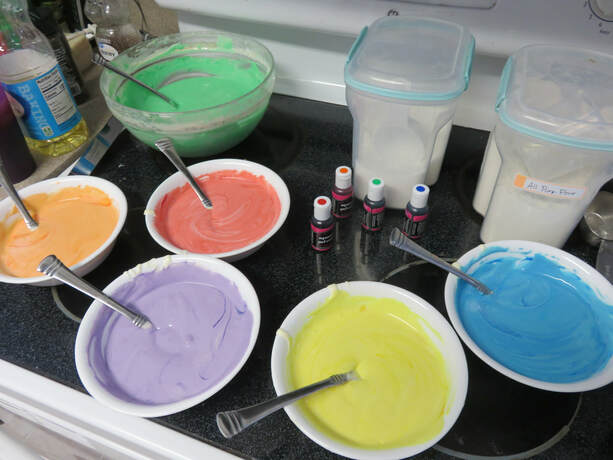 Cool your cake, and once cool, or if just doing minis, start to drop spoon fulls of colored mix.
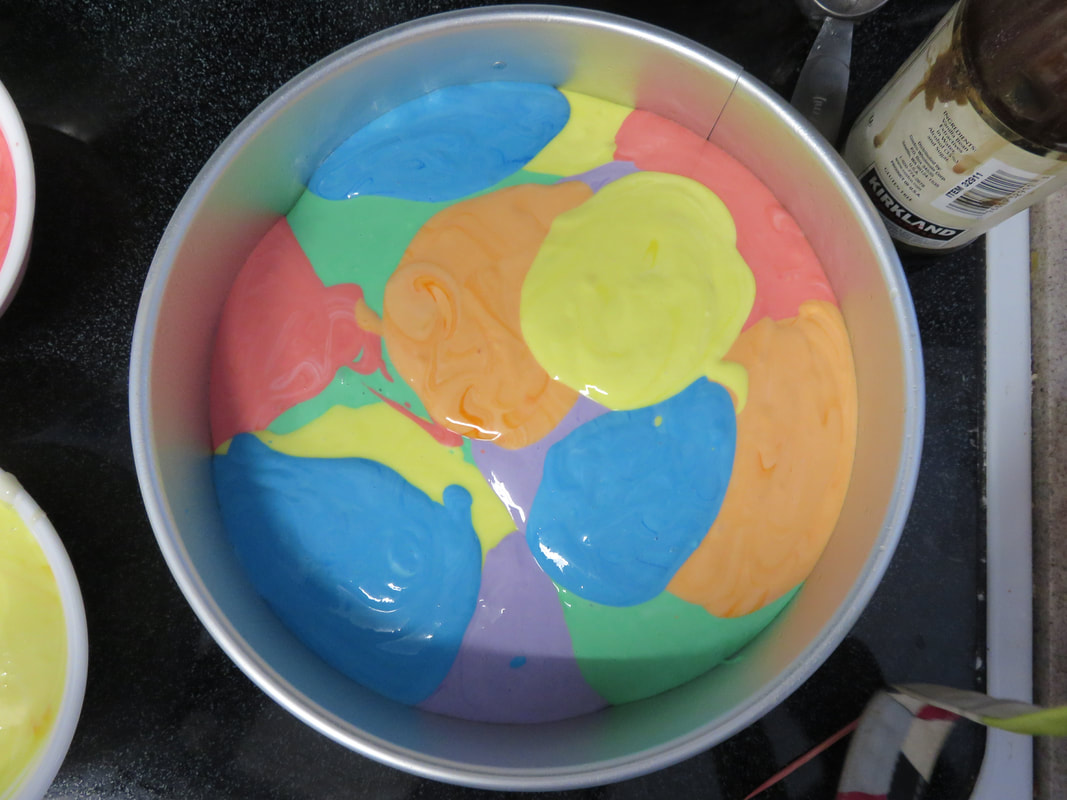
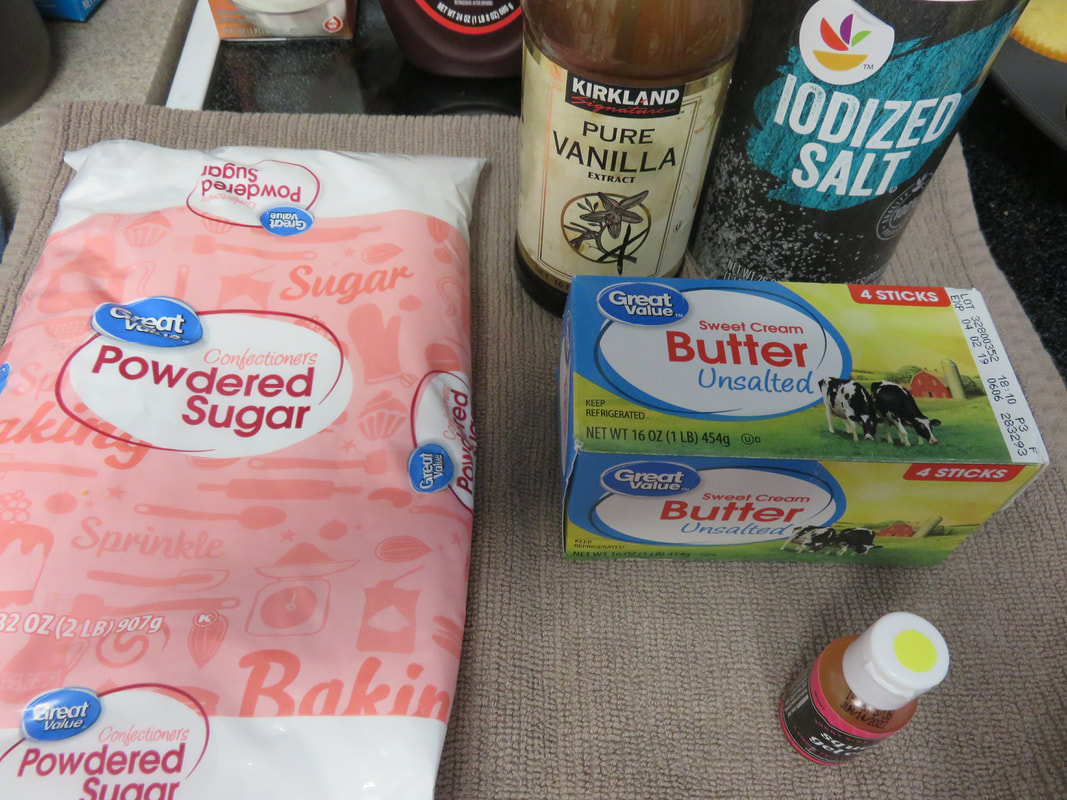
Keep dropping spoonfuls until your minis are about 2/3 full, and about an inch from the top of the larger pan, because the cheesecake mixture will expand as it cooks. Once it is all mixed, take a toothpick and drag it through the batter, swirling and mixing until you think it looks nice. 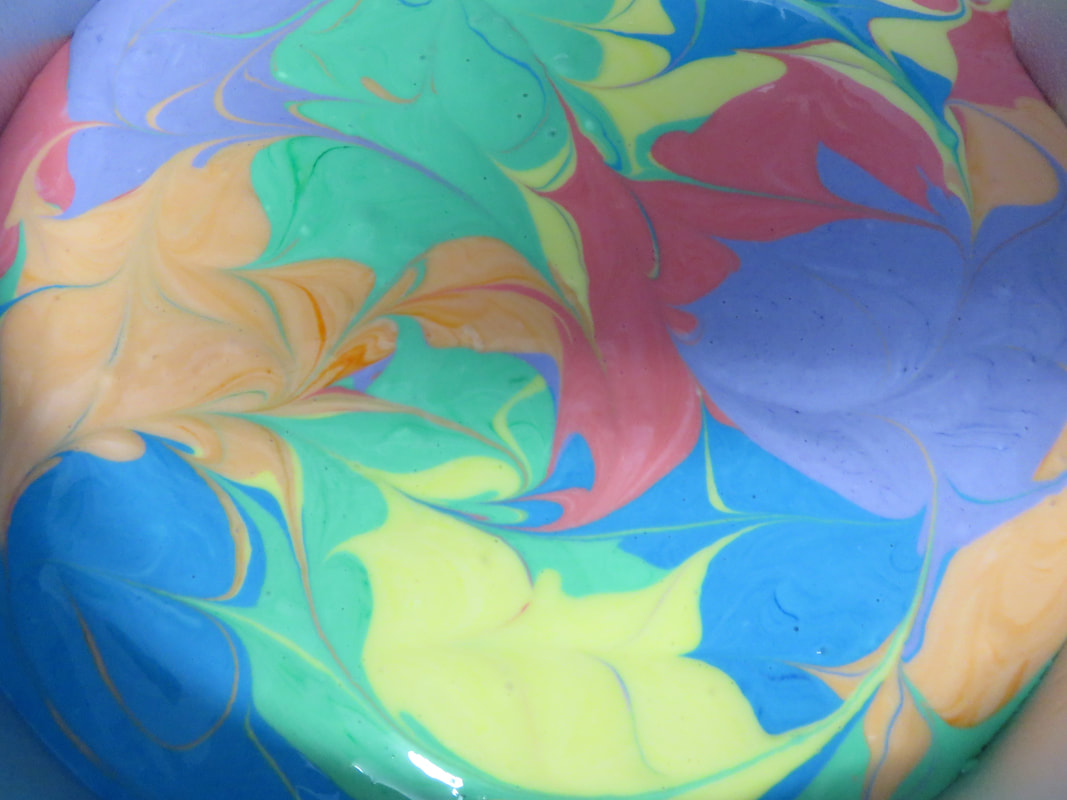 Isn't that beautiful??? Like a work of art! Pop it in the oven and keep a CLOSE eye on it. 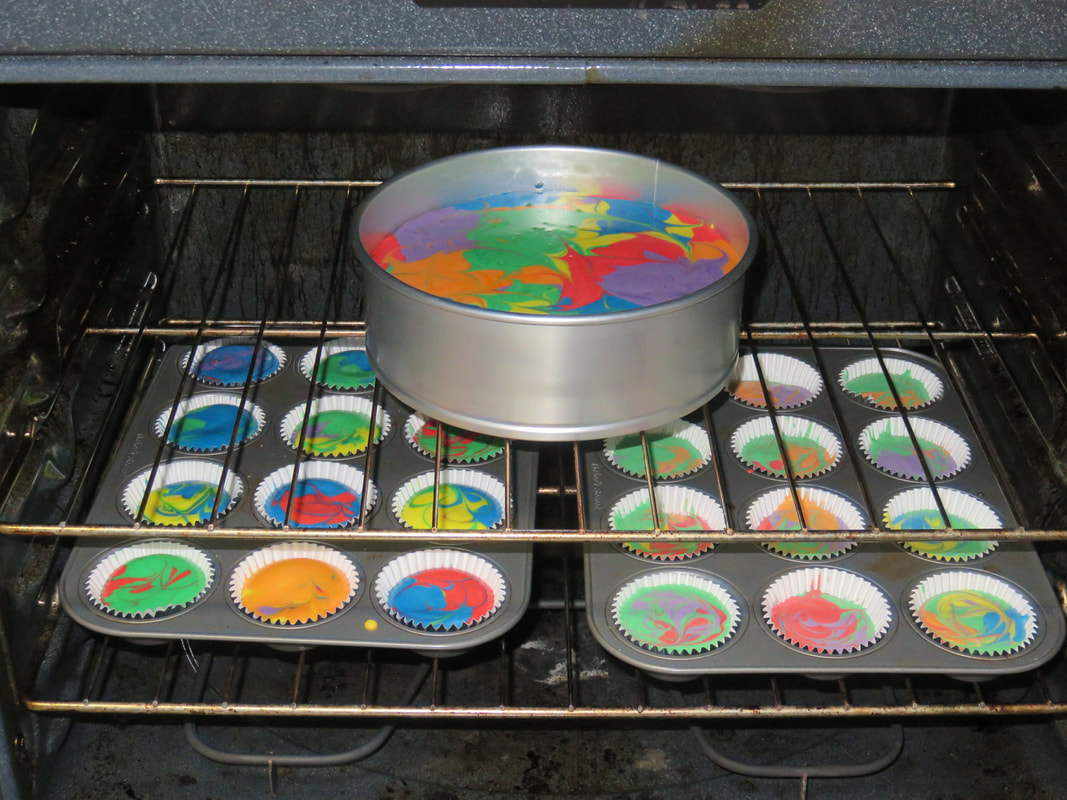 Of course, the small ones cook faster, but I am not kidding, I thought to myself, naaaah, the big one needs just another minute or two, and in that time, I went from bright colors, to a sepia tone. Still tasty, and attractive, but not the bright colors I had planned for. 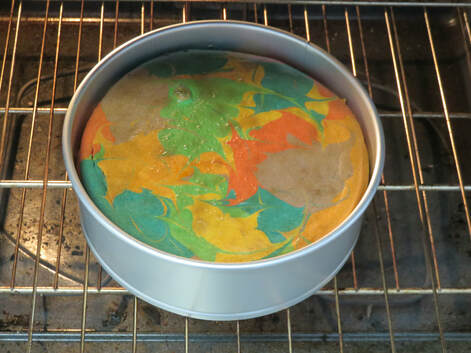 The minis turned out great, just as vibrant as when they went in, however....it would appear I didn't take a final picture of those!! Whoops! I guess we ate them too fast! Here's the recipe! Please note, I used full fat versions of ingredients, sometimes lighter doesn't bake as well. You can try whatever you like though! 1 Box mix of Red Velvet (Or your favorite flavor) the ingredients needed to make the box mix 3 bricks of REGULAR cream cheese room temp 1 1/3 cups white sugar 5 eggs 16 oz tub of REGULAR sour cream 1/4 all purpose flour 2 tsp Vanilla extract 2 tsp lemon juice food colors (I used gel) in red, purple, green, blue, yellow, orange OR your desired colors Make cake batter, and put about a third in the springform pan. Bake until done, and cool. If just making minis, skip this step! Heat oven to 325 Beat cream cheese and sugar until creamy. Add eggs, one at a time, beating between each. Add flour, vanilla, lemon juice, and sour cream and mix until incorporated, but don't overmix! Divide batter between bowls matching the number of dyes you want to use, then add dye until you have the color you want. Drop spoonfuls of colored batter over the cake, or the cupcake pan in the spring form pan, leaving about an inch from the top of the pan. Use a toothpick to swirl and blend colors. Place in the middle of the top rack of the oven and bake for 1 hour and 15 minutes for the large cake, ABOUT 20 minutes for the mini cheesecakes. This is where I went wrong with my larger one. Trust the hour 15 min unless you've made cheesecakes before and know your oven cooks quick or slow. Don't leave these alone, and keep peeking on them. Sometimes the cheesecake starts to rise too high and will make a mess in your oven. If you see it rising too high, don't turn off the heat, but open the oven door a crack for a few minutes, and then close it, the cheesecake will drop in height. The large cheesecake will not be set completely at the end of the hour 15 minutes. After the baking time is up, crack the oven door and leave in for an additional hour. After an hour, remove and cool, then refrigerate, overnight. The minis, can be eaten after just a few hours of cooling! Final step, slice, serve and enjoy! Want to see how our minis, compare with the real thing? Here's a picture on Trip Advisor that shows what the Pop Century version looks like! See how tiny it is though??? I really hope you try and make this! It's less intimidating than I thought, and I admit, I feel really proud I was able to make it! Any ideas what we should make next??  Recently I was told about an awesome Etsy seller. She is a must for any allergy parent, OR Disney lover! The owner of this shop, is a frequent Disney goer, so knows what you need, in, or out, of The Magic Kingdom. Since I just posted about going on vacation with allergies, I wanted to share my recent purchase! This is what I ordered, two magnetic signs for our front door to remind us to take the epipens when we leave the house. Only $5 each! Click on the picture to go right to the listing.  I was thrilled with the quality, the price and the fast shipping. While I didn't order anything custom Disney right now, and if you browse her site, you won't see much listed, she does custom orders, and from talking with her, can make just about anything you want! You can't get more custom than that! Need something Disney, or allergy or maybe even both? Drop her a note, and support both a Disney lover, and an Allergy Mom!  While this is primarily a quick guide for those new to traveling with food allergies, maybe it will be a good refresher for those of you who do it all the time! Winter is almost over, and thoughts keep turning to one thing...vacation! Whether you are planning spring break, or summer trips, if you or a family member have allergies, it takes a little more planning that usual. Here are a few things to keep in mind as you get ready to get going! 1. Do a little research Just like we talk here about getting a plan before you go, getting an idea of the restaurants that will be on the way, and also at your destination. If possible, check for allergy friendly places, or stick with chains that you are familiar with. Bring snacks just in case, and always, always check with staff before you order! You might even consider printing some Chef's cards, and handing them to the waitstaff. There are some great free ones from F.A.R.E, jut click the underlined link here! 2. Don't forget the phone numbers! Bring along the number to the doctor or allergist, just in case you do have a reaction, or a question. 3.Pack the Epipens, and a few extras, too! You probably are in the great habit of always bringing your Epipens, but if you were to need them on a trip, it is better to have a few extras with you, not just because you may need more than one, or one may malfunction, but because after you have been treated, you are going to need to replace the ones you've used. With the current Epipen shortage, it might be harder to find a pen, especially in an unfamiliar town. 4. Keep your extra medicines where you can get them, and at the right temperature! Those extra Epipens aren't going to do you any good if they are packed in a suitcase, in the bottom of a massive stack. They also might be subject to too much heat, or cold, which can reduce the effectiveness of the medicine. Always keep your Epipens with you, and never in a hot car. You can find insulated, or even evaporation cooling bags online, those will help a lot when you are out in the hot sun! 5. Travel with Apps If you have a smart phone, there are several great apps for you, or access to helpful websites. remember to ALWAYS verify the information on there yourself, but these are great for getting you started, or getting reviews from others. Here are two that we really like. You can click on any of these to learn more. AllergyEats Spokin (sadly, not available yet for android they are working on it, just iphone but the website is still amazing) Traveling with an allergy is a little more difficult, but it doesn't have to be impossible. Food allergies make life more difficult, but they don't have to take away the fun of traveling! Just like anything else, plan a little in advance, pack your epipens, and always check before you eat! Happy Travels! 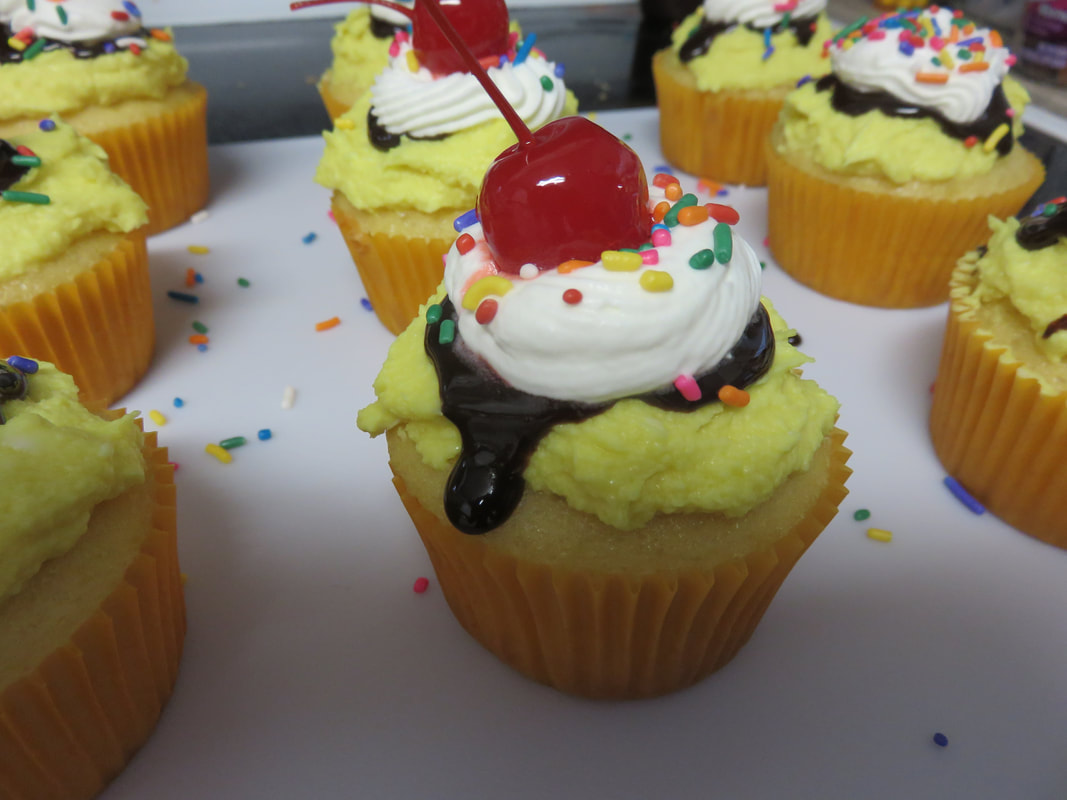 Since our youngest developed a food allergy, we have become much more aware of how difficult it can be to dine out. One of the hardest things to get are desserts, so trips to Dunkin Donuts, or most any bakery treat have been out for a while now. While the particular treat he might want may not actually have his allergen in it, it could have been exposed to the allergen through cross contact. Cross contact is when chocolate donuts are put on the same pan that ten minutes earlier nuts were sprinkled onto an iced donut. Same thing with cupcakes, muffins, cookies, often pans aren't washed between batches. Unfortunately, just because you don't see the allergen doesn't mean it's not there. The oils and proteins aren't visible from a nut that was dropped, then brushed aside, and that's what can stick to the side or bottom of a treat can cause a reaction. Cross contamination stinks, especially when you are a kid, and just want a fun looking, and tasting dessert. I've always been up for baking, but when my youngest kept talking about all the great cupcakes he had last time, and asking if they were going to be safe or not, I admit my heart broke a little. I told him they might not be, but promised I would learn to make whatever he wanted, and wow has he thrown some doozies at me. Some of them I'm worried to try, but I'm going to figure it out, and help YOU to figure it out too! I've agreed to make one Disney Dessert a month, and chronicle it here, so that I can share how AWESOME, TASTY and EASY it can be to make a Disney Dessert, AND best of all, on a budget! Here is the first he asked me to make, Pop Century's Banana Split Cupcakes, but, with vanilla icing, not banana flavored. If you really want the banana flavored icing, I bet you can find an extract for it at the grocery store. These 24 delicious Banana Split Cupcakes were made for less than the cost of 2 cupcakes at Disney, with leftover ingredients for next time. Ready to learn how? I think you'll like them as much as my baby does! Get ready!
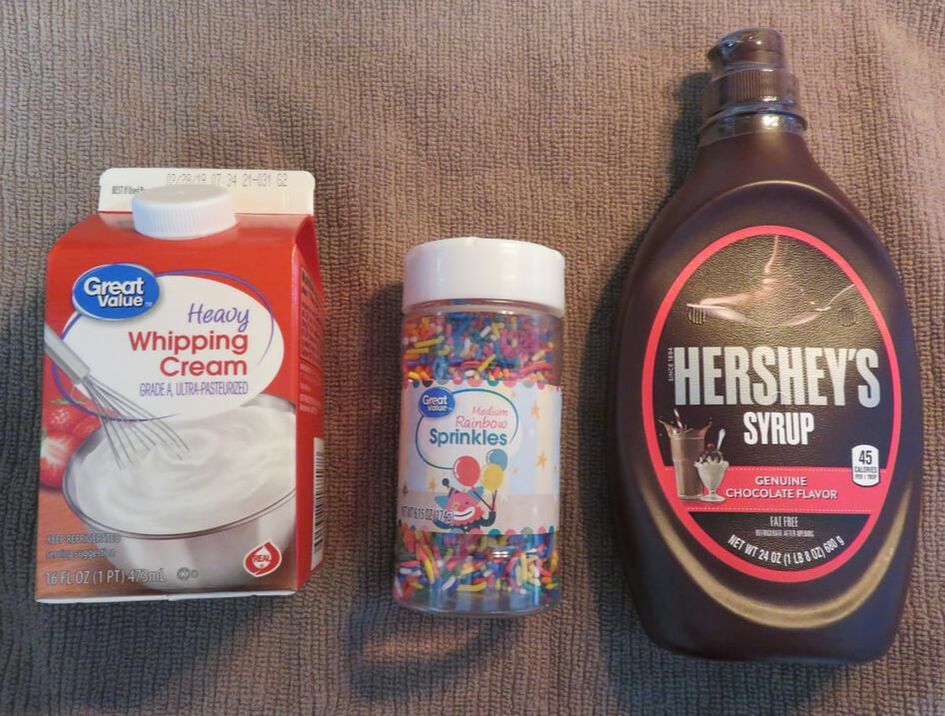
Gather your supplies. You'll need: A yellow box cake mix, your favorite brand plus all the ingredients on the back (not pictured!) Cupcake liners cupcake tins Butter, 2 sticks 1 half bag of confectioners sugar a tbs of milk 1 tsp of vanilla pinch of salt Whipping cream, whipped cream in a can, or cool whip Sprinkles Yellow icing dye Maraschino cherries (not in the picture, I totally forgot to add them!) Hershey's Chocolate sauce Make your batter, and pour into your lined pans. Bake according to instructions. 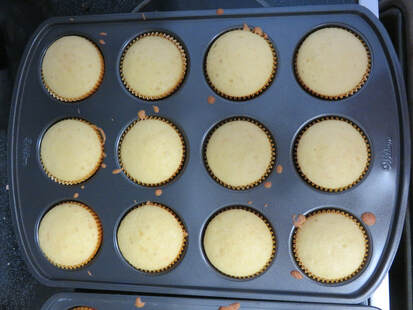 While those are cooling, start to make your icing. If you have a stand mixer, that works best, but a hand mixer can get the job done too. Beat the butter, and confectioners sugar. Add the salt, and vanilla, and drizzling in about half the milk while beating. After about 2 minutes, you will be able to tell if your icing is too stiff. If it is, add a little more milk until the icing is soft enough to push a spoon through, but not so soft a spoon can't sit upright when pushed into your icing without tipping over. If the icing is too soft, maybe it's a hot day, maybe you added too much milk, then add a little more sugar, a spoon full at a time until you get the desired constancy. 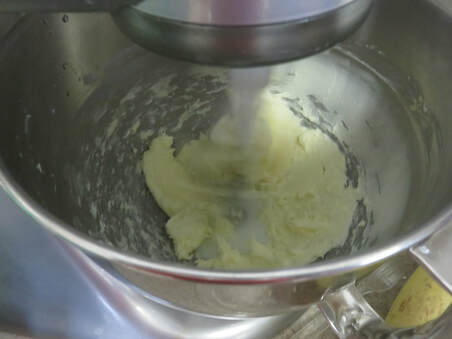 Once your icing is made, color it a cheery yellow. I like this brand of icing, it's a gel, and made in a nut free facility. I bought it at Hobby Lobby, for about $2 a bottle. I really like this better than the Wilton dye I used for so many years. It squeezes out, AND it's safe for my son's allergies.
Now it's time to put the icing on. I didn't pipe the icing on, I didn't see a need to do that, since it's going to be covered up. Just a nice dollop, and then spread almost to the edge. Take your Hershey's Syrup, and make a circle, not quite to the outer edge of your cupcake. The syrup will actually become almost gel like after a few minutes, but in the meantime, if a few drips run down, just looks more like a Banana Split Sundae! I didn't have cool whip or in the can whipped cream, so I had to make my own. If you've never done that before, all you need is heavy whipping cream, I used about a cup full, and a spoon of regular sugar to stabilize the cream. The sugar sweetens the cream, but it also stabilizes it, which is VERY important. It means that your whipped cream won't collapse, and turn back into a liquid state. Beat at a medium speed until the cream starts to stiffen and make little peaks. Don't over beat, you'll make butter! Either dollar on, or pipe with a bag and tip. I did it both ways, it looked great either way. Shake on sprinkles, and if desired, add the cherry! It's very, very yummy! Here is a picture of my version, and you can click here to visit Disney Food Blog and see a picture of the Disney version. Mine is smaller, and I don't have 3 inches of icing on there, but it's also not $6, yet still a generous portion, but not so much you can't finish it all, or feel obligated to share! What do you think? Are you going to try and make them this weekend? I will tell you...they only LOOK hard to make!  |
Archives
|

 RSS Feed
Photos from oneselfsacrifice, TheBetterDay, coconut wireless, shixart1985, Tambako the Jaguar, BudCat14/Ross, FrankHPhillips, xiquinhosilva, tcwmatt (on Hiatus), SV1XV, chocolatedazzles, philip.mallis, Castles, Capes & Clones, spablab, coconut wireless, V31S70, Joe The Goat Farmer, www.ralfsteinberger.com, gittaz, Castles, Capes & Clones, kellyhogaboom, Castles, Capes & Clones, verchmarco, gothopotam, shixart1985, Amaury Laporte, Virtual EyeSee, marada, slgckgc, Sam Howzit, wuestenigel, verchmarco, Dick Thomas Johnson, www.traveljunction.com, dulasfloyd, heymarchetti, MattCC716, PrincessAshley, Jamiesrabbits, spablab, meshmar2, Chuckcars, alexa fades away, wuestenigel
